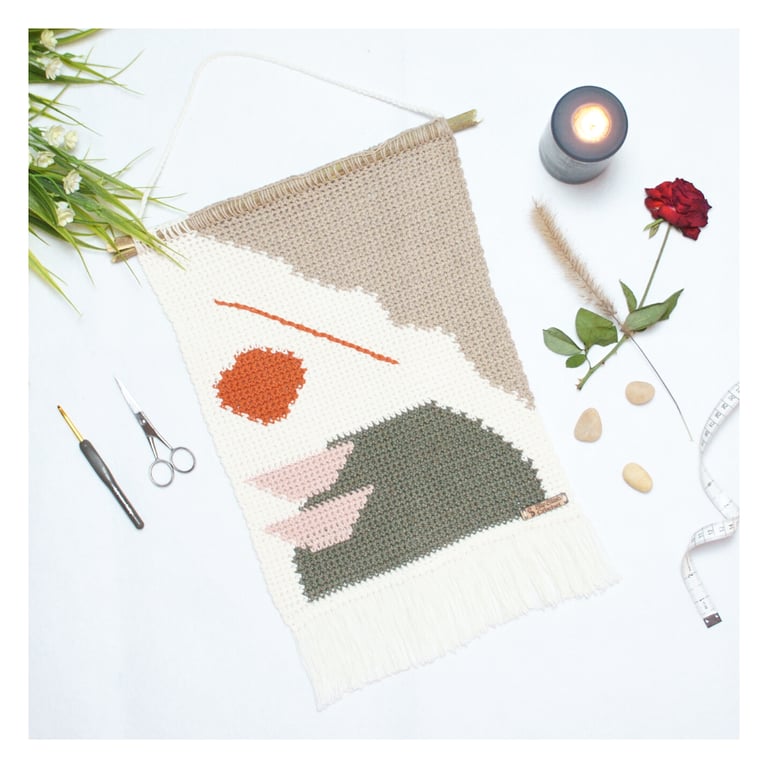
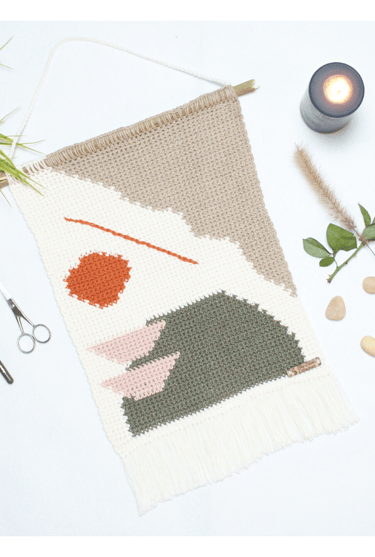
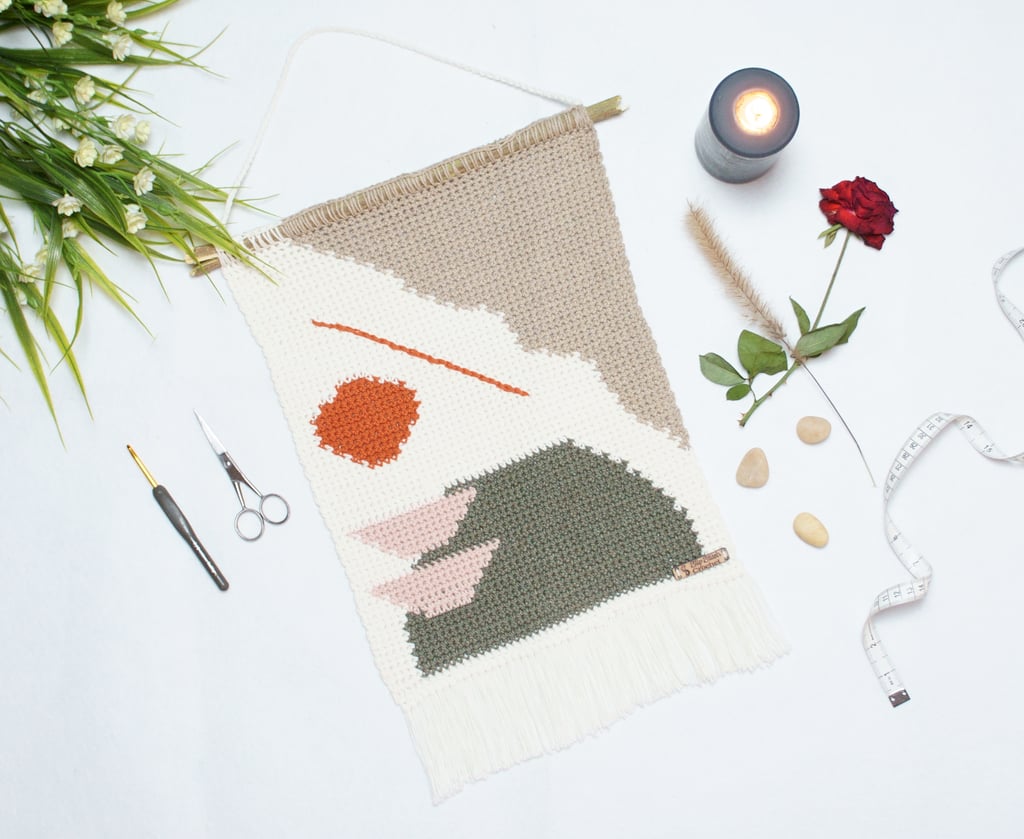
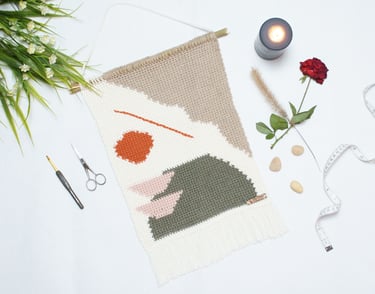
Abstract Mound Wall Hanging
FREE CROCHET PATTERN
Esraa Riyad
⠀I really liked how this design went on easily. I needed some relief from the complications. I drew the idea on a small piece of paper in principle, and it only took 3 or 4 days to crochet and write the pattern.⠀⠀
This pattern is for intermediate crocheters who are comfortable working with more than one color.
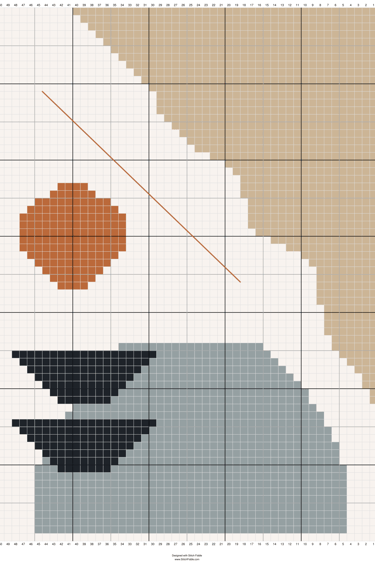
This pattern includes a colored graphic Chart with detailed instructions that come with an easy-to-read, easy-to-understand pattern and are written in U.S. Terminology., and pictures on how to crochet and assemble all the parts to make this wall hanging.
* Skills Level: Beginners - Intermediate
* Materials:
· Yarn:
>> Alize Cotton Gold:
- Light Cream Code (62)
- Khaki code (29)
- Powder code (161)
- Beige Mélange code (152)
- Tera code (36)
>> Other Yarn Suggestions:-
- Style Craft Special DK.
- CotLin Yarn by Knit Picks & Crochet.com.
· Hooks:
- 4. mm Crochet Hook (I use TULIP MinD Crochet Hook)
· Notions:
- Dowel rod or Tree Branch
- Scissors
- Darning Needle
The Crochet Pattern is also available as a premium PDF copy in my Ravelry Store
The Pattern is written in US terms.
The Wall Hanging is worked in rows.
The Wall Hanging is worked from the bottom up.
The first stitch of each row should be placed into the same stitch as the turning chain.
The turning chain doesn’t count as 1st stitch of the row.
The odd rows are the right rows and the even rows will be the wrong side.
The Wall Hanging is worked in “Single Crochet Stitch”.
The pattern is written as a color abbreviation, for example, 10 (A) means 10 single crochets in the color Light Cream.
Color change is made with the final yarn over and pull through of the last stitch before the color change. For Example: with color A, insert hook in stitch, yarn over, pull up a loop, with color B, yarn over and draw through both loops on hook, proceed with color B stitches.
The wall Hanging is worked up using the Intarsia Crochet method.
For Intarsia Crochet, you will not carry the non-working yarn. Let the yarn hang from the last stitch. You will probably have a bobbin or ball of yarn attached to each color block section of your project; I use this method in the rest of the project.
The gauge in the pattern is indicative and not mandatory. You can use any type or thickness of yarn you prefer; this will give you a different texture and a different size according to your needs.
Pattern Notes
The Pattern
Start with Foundation chain: With color (A), Ch 51, and turn.
Row 1: 50 (A). Ch1, turn, (50).
Row 2: 5 (A), 41 (B), 4 (A). Ch1, turn, (50).
Row 3: 4 (A), 41 (B), 5 (A). Ch1, turn, (50).
Row 4: 5 (A), 41 (B), 4 (A). Ch1, turn, (50).
Row 5: 4 (A), 41 (B), 5 (A). Ch1, turn, (50).
Row 6: 5 (A), 41 (B), 4 (A). Ch1, turn, (50).
Row 7: 4 (A), 41 (B), 5 (A). Ch1, turn, (50).
Row 8: 5 (A), 41 (B), 4 (A). Ch1, turn, (50).
Row 9: 4 (A), 41 (B), 5 (A). Ch1, turn, (50).
Row 10: 5 (A), 3 (B), 7 (C), 31 (B), 4 (A). Ch1, turn, (50).
Row 11: 5 (A), 29 (B), 9 (C), 1 (B), 6 (A). Ch1, turn, (50).
Row 12: 6 (A), 11 (C), 28 (B), 5 (A). Ch1, turn, (50).
Row 13: 5 (A), 27 (B), 13 (C), 5 (A). Ch1, turn, (50).
Row 14: 4 (A), 15 (C), 25 (B), 6 (A). Ch1, turn, (50).
Row 15: 6 (A), 24 (B), 17 (C), 3 (A). Ch1, turn, (50).
Row 16: 2 (A), 19 (C), 22 (B), 7 (A). Ch1, turn, (50).
Row 17: 7 (A), 34 (B), 9 (A). Ch1, turn, (50).
Row 18: 10 (A), 32 (B), 8 (A). Ch1, turn, (50).
Row 19: 1 (D), 8 (A), 26 (B), 7 (C), 8 (A). Ch1, turn, (50).
Row 20: 7 (A), 9 (C), 25 (B), 8 (A), 1 (D). Ch1, turn, (50).
Row 21: 2 (D), 8 (A), 23 (B), 11 (C), 6 (A). Ch1, turn, (50).
Row 22: 5 (A), 13 (C), 21 (B), 9 (A), 2 (D). Ch1, turn, (50).
Row 23: 3 (D), 9 (A), 19 (B), 15 (C), 4 (A). Ch1, turn, (50).
Row 24: 3 (A), 17 (C), 17 (B), 9 (A), 4 (D). Ch1, turn, (50).
Row 25: 5 (D), 9 (A), 15 (B), 19 (C), 2 (A). Ch1, turn, (50).
Row 26: 16 (A), 19 (B), 9 (A), 6 (D). Ch1, turn, (50).
Row 27: 6 (D), 44 (A). Ch1, turn, (50).
Row 28: 43 (A), 7 (D). Ch1, turn, (50).
Row 29: 7 (D), 43 (A). Ch1, turn, (50).
Row 30: 43 (A), 7 (D). Ch1, turn, (50).
Row 31: 7 (D), 43 (A). Ch1, turn, (50).
Row 32: 42 (A), 8 (D). Ch1, turn, (50).
Row 33: 8 (D), 42 (A). Ch1, turn, (50).
Row 34: 8 (A), 4 (E), 30 (A), 8 (D). Ch1, turn, (50).
Row 35: 8 (D), 29 (A), 6 (E), 7 (A). Ch1, turn, (50).
Row 36: 6 (A), 8 (E), 28 (A), 8 (D). Ch1, turn, (50).
Row 37: 9 (D), 26 (A), 10 (E), 5 (A). Ch1, turn, (50).
Row 38: 4 (A), 12 (E), 24 (A), 10 (D). Ch1, turn, (50).
Row 39: 12 (D), 21 (A), 14 (E), 3 (A). Ch1, turn, (50).
Row 40: 3 (A), 14 (E), 19 (A), 14 (D). Ch1, turn, (50).
Row 41: 16 (D), 17 (A), 14 (E), 3 (A). Ch1, turn, (50).
Row 42: 3 (A), 14 (E), 16 (A), 17 (D). Ch1, turn, (50).
Row 43: 17 (D), 16 (A), 14 (E), 3 (A). Ch1, turn, (50).
Row 44: 4 (A), 12 (E), 17 (A), 17 (D). Ch1, turn, (50).
Row 45: 17 (D), 18 (A), 10 (E), 5 (A). Ch1, turn, (50).
Row 46: 7 (A), 6 (E), 19 (A), 18 (D). Ch1, turn, (50).
Row 47: 18 (D), 20 (A), 4 (E), 8 (A). Ch1, turn, (50).
Row 48: 32 (A), 18 (D). Ch1, turn, (50).
Row 49: 19 (D), 31 (A). Ch1, turn, (50).
Row 50: 30 (A), 20 (D). Ch1, turn, (50).
Row 51: 22 (D), 28 (A). Ch1, turn, (50).
Row 52: 26 (A), 24 (D). Ch1, turn, (50).
Row 53: 25 (D), 25 (A). Ch1, turn, (50).
Row 54: 24 (A), 26 (D). Ch1, turn, (50).
Row 55: 27 (D), 23 (A). Ch1, turn, (50).
Row 56: 22 (A), 28 (D). Ch1, turn, (50).
Row 57: 29 (D), 21 (A). Ch1, turn, (50).
Row 58: 21 (A), 29 (D). Ch1, turn, (50).
Row 59: 29 (D), 21 (A). Ch1, turn, (50).
Row 60: 20 (A), 30 (D). Ch1, turn, (50).
Row 61: 31 (D), 19 (A). Ch1, turn, (50).
Row 62: 18 (A), 32 (D). Ch1, turn, (50).
Row 63: 33 (D), 17 (A). Ch1, turn, (50).
Row 64: 16 (A), 34 (D). Ch1, turn, (50).
Row 65: 35 (D), 15 (A). Ch1, turn, (50).
Row 66: 14 (A), 36 (D). Ch1, turn, (50).
Row 67: 37 (D), 13 (A). Ch1, turn, (50).
Row 68: 12 (A), 38 (D). Ch1, turn, (50).
Row 69: 39 (D), 11 (A). Ch1, turn, (50).
Row 70: 10 (A), 40 (D). Ch1, turn, (50).
Finished Measurements:
Approx. 12 x 14 inch / 30 x 35 cm
(not including fringe or hanging thread)Gage: 17 sts x 20 rows in pattern
= (4x4 inch / 10x10 cm).Color Abbreviations:
(A) = Light Cream
(B) = Khaki
(C) = Powder
(D) = Beige mélange
(E) = Tera
Stitch Key:
ch = chain
st/sts = stitch(es)
SC = single crochet
Chart
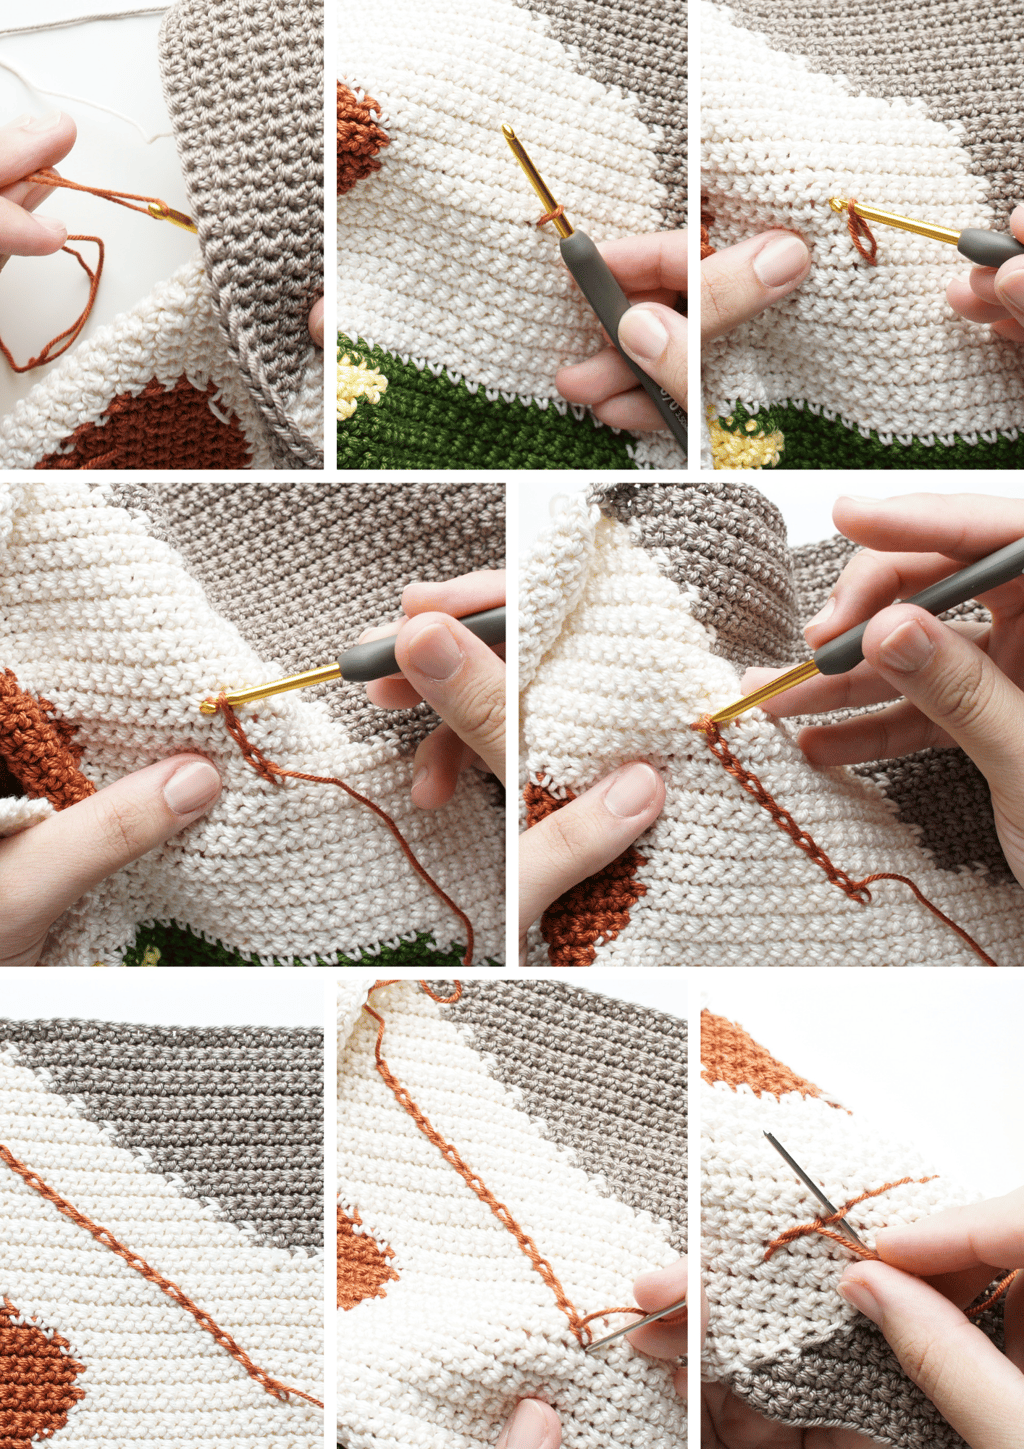
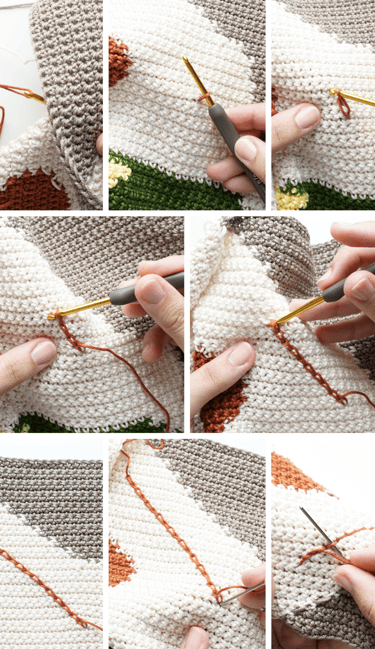
Surface Overlay Crochet
Now you can apply Surface Overlay Crochet Line if you want, and here is a detailed explanation of what you should do here:
1- With (E), Make a slip knot, take slip knot off-hook, with yarn and slip knot below work, insert hook from first stitch.
2- Put slip knot on hook, tighten, pull loop back up through same. Working yarn will be under work.
3- Insert hook in next, with yarn below work, yo, pull up loop, pull through loop on hook; repeat from * across (approx. 25 chs) in straight line.
4- Fasten off, weave in ends.
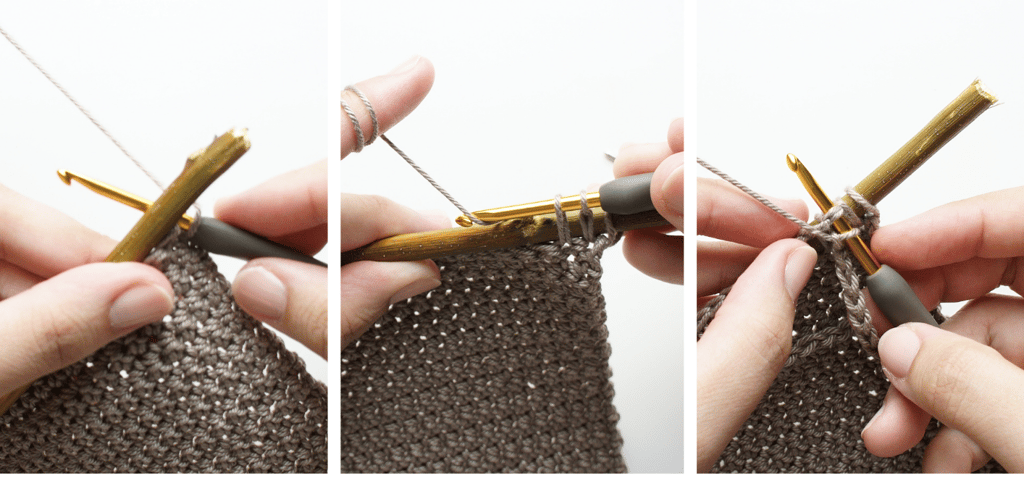
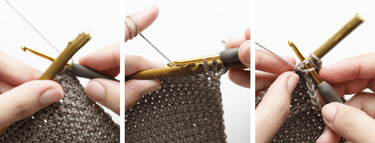
Attaching the wooden dowel/tree branch:
After finishing the last row in your wall Hanging, don’t fasten off or cut your yarn, just continue and work SC around the branch/dowel:
1- Insert the hook into the first stitch and under the wood dowel, grab the yarn in the other hand.
2- Yarn Over, then pull through the loop and repeat till you reach the last stitch.
3- Now, chain about 60-70 chains to make the hanging Strap.
4- Attach the last chain into the first chain on the dowel with Slip Stitch.
5- Fasten Off and Wave ends.
Finishing
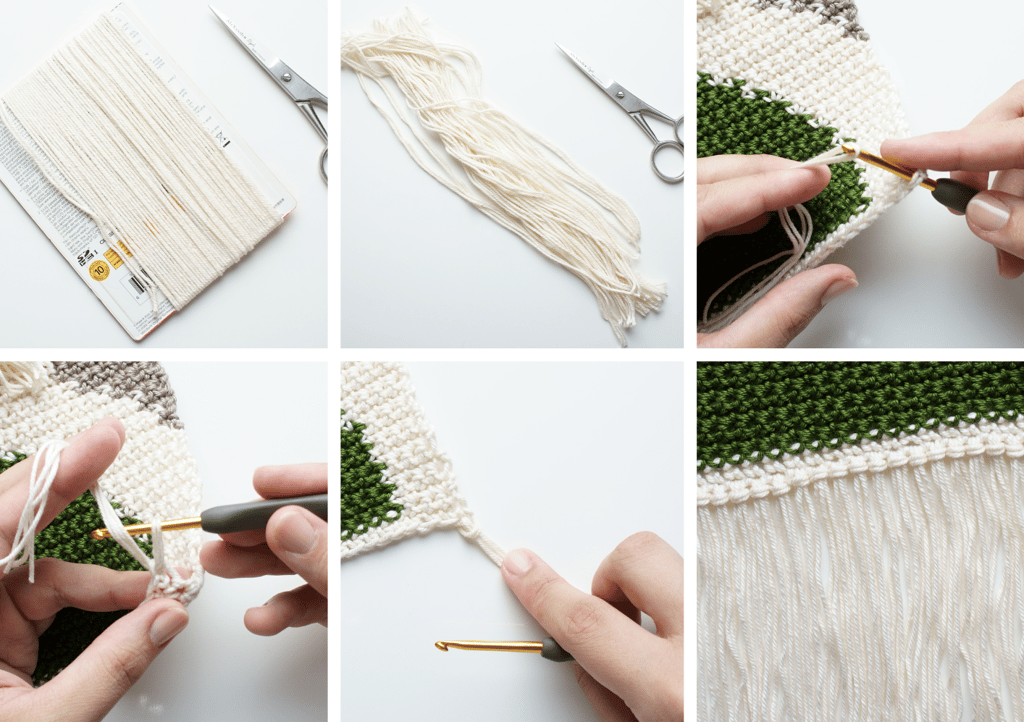
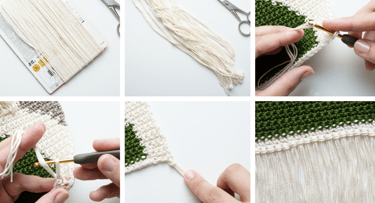
Attaching the Fringes:
- To Create the Fringe cut 20 cm / 8-inch pieces of yarn in … you will need 2 strands to complete one Fringe.
- To attach the Fringe, grab 2 strands of yarn, use a larger crochet hook and punch the hook through the f foundation chain on the bottom of the piece, fold the 2 strands in half and loop the middle of the strands onto the crochet hook and pull the loop of strands through the foundation chain.
- You can use a wooden comb to straighten the fringe before cutting them.
Blocking:
- You can Block your Wall Hanging with Steam, and let it dry in until completely dry.
- You can also wash it with lukewarm water, get rid of the water by gently squeezing it, leave it on a clean towel placed on a flat surface and leave it until it dries completely.
And You Are DONE
Happy Crocheting
The content of this pattern, details, and photos are property of “Esraa Riyad Designs”. Distribution, Copying, or sharing of this pattern is not permissible. Please feel free to use this pattern to create and sell, only with the credentials of the pattern given to “Esraa Riyad Designs”. I'd absolutely love to see your product photos, please tag or link your items with @esraariyad.designs on Facebook and Instagram.
Do you have any questions?
Please do not hesitate to contact me.
Copyright Statement
This pattern is also available for purchase through Love Crafts Store with all the suggested yarn you will need to make this beauty